


Hello Coders !! This simple and basic article is about the laravel and vue js CRUD tutorial. In this article, we are going to develop simple Create, Read, Update and delete operation using vue js.
1. Install Laravel
The first and foremost step is to install laravel
You can install a fresh laravel setup using the below command via the composer’s create-project.
composer create-project --prefer-dist laravel/laravel laravelvuecrud— OR —
But if you have installed a laravel installer in your system then you can directly write this command in your terminal inside your working directory.
laravel new laravelvuecrudIf you do not have the laravel installer then you can install it globally using this command.
composer global require laravel/installerFor more information regarding this, you can check this link Install Laravel.
After installing laravel setup the laravel project and connect your fresh database with the project. or you can check this article Setup Laravel.
Don’t forget to connect the database. After this go inside the project directory.
cd laravelvuecrud2. Install Node
If you do not have node install in your system then first you have to download and install node in your system. you can use this link Node Js install.
If you have already installed node or not to check you just need to write node -v and you will the node version in output. And if not installed yet then first you need to install it.
node -v
//output v13.11.0
3. Install npm
Install npm using below command
install npmSolve dependencies if you found any error.
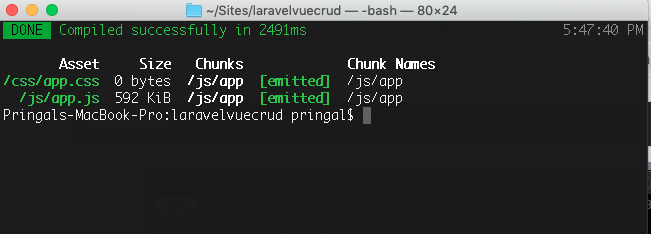
3. Compile Assets
Start compiling assets using the below command.
npm run devThis command will give you output like the below screenshot.
If you found any error of ELIFECYCLE or any others then follow the below steps.
Step–1:
npm cache clean --forceStep–2: Delete node_modules by below command
rm -rf node_modules package-lock.jsonStep–3:
npm installand if needed then do run $ npm start
4. Install Vue dependencies
To install the vue dependencies you need to write the below command in your terminal.
npm install vuenpm install vue-router vue-axiosThis command will install the vue-router and Vue-Axios dependencies. the Vue-Router is useful for routing vue.js application so we can use the different components. For sending the network requests to the server we need to install the Vue-Axios.
Modify App.js file
Now we are going to change the resources/js/app.js file after adding code it will look like below.
// App.js

require('./bootstrap');

window.Vue = require('vue');

import VueRouter from 'vue-router';
Vue.use(VueRouter);

import VueAxios from 'vue-axios';
import axios from 'axios';
Vue.use(VueAxios, axios);

Vue.component('example-component', require('./components/ExampleComponent.vue'));

const router = new VueRouter({ mode: 'history'});
const app = new Vue(Vue.util.extend({ router })).$mount('#app');
In the above code, I have added the vue-Router and vue-Axios.
Create Routes
Next, we are going to create routes for the item list and for that just open the web.php file from the routes folder and add the below code. (routes/web.php)
<?php

use Illuminate\Support\Facades\Route;

/*
|--------------------------------------------------------------------------
| Web Routes
|--------------------------------------------------------------------------
|
| Here is where you can register web routes for your application. These
| routes are loaded by the RouteServiceProvider within a group which
| contains the "web" middleware group. Now create something great!
|
*/

Route::get('/{any}', function () {
  return view('item');
})->where('any', '.*');
In the above route, we can push any route and you can use the Laravel route proxy as a Vue Route along with you can show the Vue components depend on the current URL.
Create an item view file
Next, we are going to create a blade view file inside the resources/views/item.blade.php and add the below code in it.
<!doctype html>
<html lang="{{ str_replace('_', '-', app()->getLocale()) }}">
    <head>
        <meta charset="utf-8">
        <meta name="viewport" content="width=device-width, initial-scale=1">
        <title>Laravel</title>
        <link href="https://fonts.googleapis.com/css?family=Roboto:200,600" rel="stylesheet" type="text/css">
        <link href="{{ mix('css/app.css') }}" type="text/css" rel="stylesheet" />
        <meta name="csrf-token" value="{{ csrf_token() }}" />
    </head>
    <body>
        <div id="app">
          <example-component></example-component>
        </div>
        <script src="{{ mix('js/app.js') }}" type="text/javascript"></script>
    </body>
</html>
After this, if you visit the home page you can now see the rendered vue component.
5. Create Vue Components
Inside this resources/js directory create a folder called “components“
and create these four vue components.
- HomeComponent.vue
- CreateComponent.vue
- EditComponent.vue
- IndexComponent.vue
Below I have put the code respectively for all these four files.
// HomeComponent.vue

<template>
  <div class="row justify-content-center">
      <div class="col-md-8">
          <div class="card card-default">
              <div class="card-header">Main Home Component</div>

              <div class="card-body">
                  Content of the Component component.
              </div>
          </div>
      </div>
  </div>
</template>

<script>
    export default {
        mounted() {
            console.log('Component mounted.')
        }
    }
</script>
// CreateComponent.vue
<template>
<div class="row justify-content-center">
<div class="col-md-8">
<div class="card card-default">
<div class="card-header">Create Component</div>
<div class="card-body">
I'm the Create Component component.
</div>
</div>
</div>
</div>
</template>
<script>
export default {
mounted() {
console.log('Component mounted.')
}
}
</script>// EditComponent.vue
<template>
<div class="row justify-content-center">
<div class="col-md-8">
<div class="card card-default">
<div class="card-header">Edit Component</div>
<div class="card-body">
I'm an Edit component.
</div>
</div>
</div>
</div>
</template>
<script>
export default {
mounted() {
console.log('Example Component mounted.')
}
}
</script>// IndexComponent.vue
<template>
<div class="row justify-content-center">
<div class="col-md-8">
<div class="card card-default">
<div class="card-header">Index Component</div>
<div class="card-body">
I'm an Index component.
</div>
</div>
</div>
</div>
</template>
<script>
export default {
mounted() {
console.log('Index Component mounted.')
}
}
</script>So just put these four files inside the components folder.
6. vue-router Configuration
Open the resources/js/app.js after update the file it will look like below.
// app.js

require('./bootstrap');

window.Vue = require('vue');

import VueRouter from 'vue-router';
Vue.use(VueRouter);

import VueAxios from 'vue-axios';
import axios from 'axios';

import App from './App.vue';
Vue.use(VueAxios, axios);

import HomeComponent from './components/HomeComponent.vue';
import CreateComponent from './components/CreateComponent.vue';
import IndexComponent from './components/IndexComponent.vue';
import EditComponent from './components/EditComponent.vue';

const routes = [
  {
      name: 'home',
      path: '/',
      component: HomeComponent
  },
  {
      name: 'create',
      path: '/create',
      component: CreateComponent
  },
  {
      name: 'items',
      path: '/items',
      component: IndexComponent
  },
  {
      name: 'edit',
      path: '/edit/:id',
      component: EditComponent
  }
];

const router = new VueRouter({ mode: 'history', routes: routes});
const app = new Vue(Vue.util.extend({ router }, App)).$mount('#app');
In the above code, I have created the four-component along with routed of our application. After that, I have created a router object and passed it to the Vue application.
Now, Let’s create one more vue component at resources/js folder and name it App.vue as a file and the below code in it.
// App.vue
<template>
<div class="container">
<div>
<transition name="fade">
<router-view></router-view>
</transition>
</div>
</div>
</template>
<style>
.fade-enter-active, .fade-leave-active {
transition: opacity .5s
}
.fade-enter, .fade-leave-active {
opacity: 0
}
</style>
<script>
export default{
}
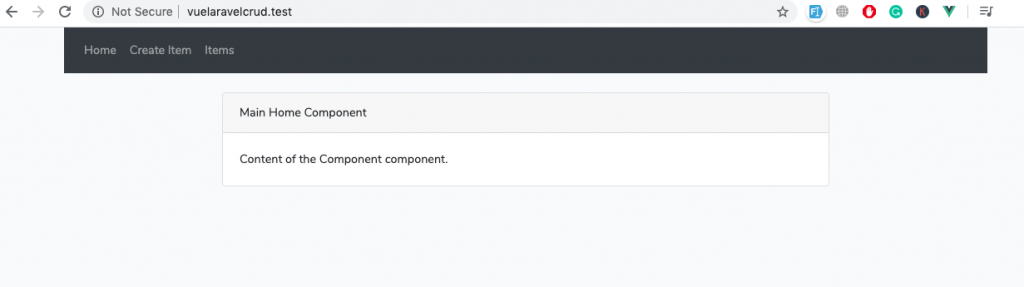
</script>The above code is for the define router-view. it is the directive that will render the component according to the fired URL. The component name will change according to the route. So for example /index is in the URL then IndexComponent on the webpage.
Now if the watch is not running then you need to compile it again by typing on the terminal npm run watch will compile the code again.
Sp your URL must be like this.
- http://laravelvuecrud.test/create
- http://laravelvuecrud.test/items
- http://laravelvuecrud.test/edit/1
Top Navigation bar (optional)
If you want to create a navigation bar to ease then you can do it by following way in our article of laravel and vue js crud tutorial.
For this navigation bar, we are also going to add the code inside the App.vue file so the updated code should look like this.
// App.vue

<template>
  <div class="container">
    <nav class="navbar navbar-expand-sm bg-dark navbar-dark">
      <ul class="navbar-nav">
        <li class="nav-item">
          <router-link to="/" class="nav-link">Home</router-link>
        </li>
        <li class="nav-item">
          <router-link to="/create" class="nav-link">Create Item</router-link>
        </li>
        <li class="nav-item">
          <router-link to="/items" class="nav-link">Items</router-link>
        </li>
      </ul>
    </nav><br />
    <transition name="fade">
      <router-view></router-view>
    </transition>
  </div>
</template>

<style>
    .fade-enter-active, .fade-leave-active {
      transition: opacity .5s
    }
    .fade-enter, .fade-leave-active {
      opacity: 0
    }
</style>

<script>

    export default{
    }
</script>
Installing Bootstrap
If you are using laravel 6 or higher version then you need to manually install bootstrap using below commands.
composer require laravel/ui

php artisan ui bootstrap
After you open the home page you can set the output like this.
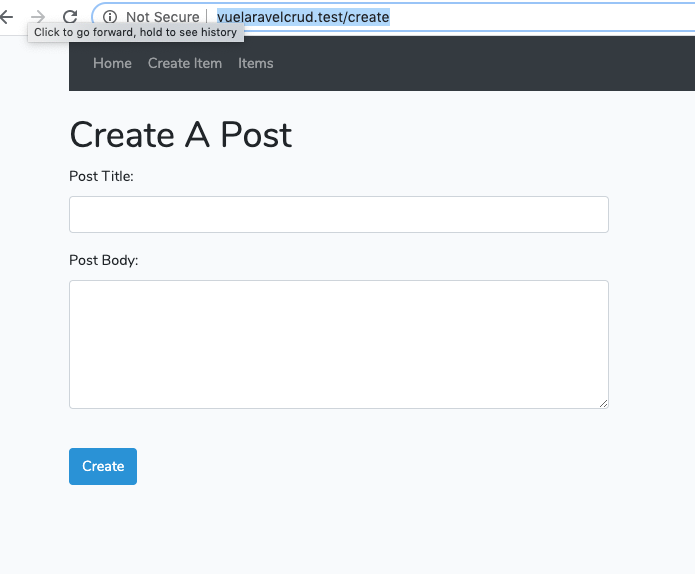
7. Create Item form
To make a create form we will add the code inside the CreateComponent.vue file and after adding code it will look like below code.
// CreateItem.vue

<template>
  <div>
    <h1>Create A Item</h1>
    <form @submit.prevent="addItem">
      <div class="row">
        <div class="col-md-6">
          <div class="form-group">
            <label>Item Title:</label>
            <input type="text" class="form-control" v-model="item.title">
          </div>
        </div>
        </div>
        <div class="row">
          <div class="col-md-6">
            <div class="form-group">
              <label>Item Body:</label>
              <textarea class="form-control" v-model="item.body" rows="5"></textarea>
            </div>
          </div>
        </div><br />
        <div class="form-group">
          <button class="btn btn-primary">Create</button>
        </div>
    </form>
  </div>
</template>

<script>
    export default {
        data(){
        return {
          item:{}
        }
    },
    methods: {
      addItem(){
        console.log(this.item);
      }
    }
  }
</script>
In the above form, there are two attributes Item title and Item body and one method addItem() and after form submission, we will get the value inside the addItem() method from then we will send the POST request to the laravel backend and stored data in the database from there.
To test the created Item create page let’s open create http://laravelvuecrud.test/create and it will look like this.
8. Laravel Backend support
From this step, we are going to work with the laravel framework to build backend support because this is laravel and vue js crud tutorial so there is also a major part of laravel too so that will help to store data into the database. So for that, we are going to make an API’s. So, for that, we are going to start from data table creation.
run below command in your terminal inside the project directory.
php artisan make:model Item -mThis command will create the migration file inside the database/migration so find it and open it and add the below code in it.
public function up()
{
    Schema::create('items', function (Blueprint $table) {
       $table->increments('id');
       $table->string('title');
       $table->text('body');
       $table->timestamps();
    });
}
After adding the attribute we will migrate this table into the database so for that run this command inside the terminal.
php artisan migrateThis command will create a table called Items inside the database.
Now, you will also see the model file called “Items.php” inside the app folder in that file write below code.
<?php

// Item.php

namespace App;

use Illuminate\Database\Eloquent\Model;

class Item extends Model
{
    protected $fillable = ['title', 'body'];
}
After creating a model we are going to create the controller file inside the app/Http/Controller so for creating controller file run below command in terminal.
php artisan make:controller ItemControllerThis command will create the controller file.
After creating a controller file we are going to use Laravel resource collection for API development. so for that run below command.
php artisan make:resource ItemCollectionThis ItemCollection.php file will generate inside the app/Http/Resources/ItemCollection.php and the file will look like this.
<?php

// ItemCollection.php

namespace App\Http\Resources;

use Illuminate\Http\Resources\Json\ResourceCollection;

class ItemCollection extends ResourceCollection
{
    /**
     * Transform the resource collection into an array.
     *
     * @param  \Illuminate\Http\Request  $request
     * @return array
     */
    public function toArray($request)
    {
        return parent::toArray($request);
    }
}
ItemController.php file with operations
After adding all the functions for edit, update, index, and delete the file will look like this.
<?php

// ItemController.php

namespace App\Http\Controllers;

use Illuminate\Http\Request;
use App\Http\Resources\ItemCollection;
use App\Item;

class ItemController extends Controller
{
    public function store(Request $request)
    {
      $item = new Item([
        'title' => $request->get('title'),
        'body' => $request->get('body')
      ]);

      $item->save();

      return response()->json('successfully added');
    }

    public function index()
    {
      return new ItemCollection(Item::all());
    }

    public function edit($id)
    {
      $item = Item::find($id);
      return response()->json($item);
    }

    public function update($id, Request $request)
    {
      $item = Item::find($id);

      $item->update($request->all());

      return response()->json('successfully updated');
    }

    public function delete($id)
    {
      $item = Item::find($id);

      $item->delete();

      return response()->json('successfully deleted');
    }
}
9. API Routes
Open up the routes/api.php file and add below routes in it.
<?php

use Illuminate\Http\Request;
use Illuminate\Support\Facades\Route;

/*
|--------------------------------------------------------------------------
| API Routes
|--------------------------------------------------------------------------
|
| Here is where you can register API routes for your application. These
| routes are loaded by the RouteServiceProvider within a group which
| is assigned the "api" middleware group. Enjoy building your API!
|
*/

Route::middleware('auth:api')->get('/user', function (Request $request) {
    return $request->user();
});

Route::post('/item/create', 'ItemController@store');
Route::get('/item/edit/{id}', 'ItemController@edit');
Route::post('/item/update/{id}', 'ItemController@update');
Route::delete('/item/delete/{id}', 'ItemController@delete');
Route::get('/items', 'ItemController@index');
Use Axios to send a network request
Open up the CreateComponent.vue file and add the below code in it.
// CreateComponent.vue

<template>
  <div>
    <h1>Create A Item</h1>
    <form @submit.prevent="addItem">
      <div class="row">
        <div class="col-md-6">
          <div class="form-group">
            <label>Item Title:</label>
            <input type="text" class="form-control" v-model="item.title">
          </div>
        </div>
        </div>
        <div class="row">
          <div class="col-md-6">
            <div class="form-group">
              <label>Item Body:</label>
              <textarea class="form-control" v-model="item.body" rows="5"></textarea>
            </div>
          </div>
        </div><br />
        <div class="form-group">
          <button class="btn btn-primary">Create</button>
        </div>
    </form>
  </div>
</template>

<script>
    export default {
        data(){
        return {
          item:{}
        }
    },
    methods: {
     addItem(){
      let uri = 'http://laravelvuecrud.test/api/item/create';
      this.axios.post(uri, this.item).then((response) => {
       this.$router.push({name: 'items'});
    });
}
    }
  }
</script>
The above code will post a request to the server’s point API with sent data and stored in the database.
List created Items page
Open up the IndexComponent.vue file and add the below code to list all created items and there actions to perform an operation on it.
// IndexComponent.vue

<template>
  <div>
      <h1>Items</h1>
        <div class="row">
          <div class="col-md-10"></div>
          <div class="col-md-2">
            <router-link :to="{ name: 'create' }" class="btn btn-primary">Create Item</router-link>
          </div>
        </div><br />

        <table class="table table-hover">
            <thead>
            <tr>
                <th>ID</th>
                <th>Item Name</th>
                <th>Item Price</th>
                <th>Actions</th>
            </tr>
            </thead>
            <tbody>
                <tr v-for="item in items" :key="item.id">
                    <td>{{ item.id }}</td>
                    <td>{{ item.title }}</td>
                    <td>{{ item.body }}</td>
                    <td><router-link :to="{name: 'edit', params: { id: item.id }}" class="btn btn-primary">Edit</router-link></td>
                    <td><button class="btn btn-danger">Delete</button></td>
                </tr>
            </tbody>
        </table>
  </div>
</template>

<script>
  export default {
      data() {
        return {
          items: []
        }
      },
      created() {
      let uri = 'http://laravelvuecrud.test/api/items';
      this.axios.get(uri).then(response => {
        this.items = response.data.data;
      });
    }
  }
</script>
In the above page, Axios is wrapping our backend data posts with data as we are using Resource Collection.
Edit and Update request form
The below code is for the edit and updates the data. We are using the UpdateItem() function to update the data.
// EditComponent.vue

<template>
  <div>
    <h1>Edit Item</h1>
    <form @submit.prevent="updateItem">
      <div class="row">
        <div class="col-md-6">
          <div class="form-group">
            <label>Item Title:</label>
            <input type="text" class="form-control" v-model="item.title">
          </div>
        </div>
        </div>
        <div class="row">
          <div class="col-md-6">
            <div class="form-group">
              <label>Item Body:</label>
              <textarea class="form-control" v-model="item.body" rows="5"></textarea>
            </div>
          </div>
        </div><br />
        <div class="form-group">
          <button class="btn btn-primary">Update</button>
        </div>
    </form>
  </div>
</template>

<script>
    export default {

      data() {
        return {
          item: {}
        }
      },
      created() {
        let uri = `http://laravelvuecrud.test/api/item/edit/${this.$route.params.id}`;
        this.axios.get(uri).then((response) => {
            this.item = response.data;
        });
      },
      methods: {
        updateItem() {
          let uri = `http://laravelvuecrud.test/api/item/update/${this.$route.params.id}`;
          this.axios.post(uri, this.item).then((response) => {
            this.$router.push({name: 'items'});
          });
        }
      }
    }
</script>
Form the above page you can edit the data.
Delete request page
Write the final code inside the IndexComponent.vue file.
// IndexComponent.vue

<template>
  <div>
      <h1>Items</h1>
        <div class="row">
          <div class="col-md-10"></div>
          <div class="col-md-2">
            <router-link :to="{ name: 'create' }" class="btn btn-primary">Create Item</router-link>
          </div>
        </div><br />

        <table class="table table-hover">
            <thead>
            <tr>
                <th>ID</th>
                <th>Item Name</th>
                <th>Item Price</th>
                <th>Actions</th>
            </tr>
            </thead>
            <tbody>
                <tr v-for="item in items" :key="item.id">
                    <td>{{ item.id }}</td>
                    <td>{{ item.title }}</td>
                    <td>{{ item.body }}</td>
                    <td><router-link :to="{name: 'edit', params: { id: item.id }}" class="btn btn-primary">Edit</router-link></td>
                    <td><button class="btn btn-danger" @click.prevent="deleteItem(item.id)">Delete</button></td>
                </tr>
            </tbody>
        </table>
  </div>
</template>

<script>
  export default {
      data() {
        return {
          items: []
        }
      },
      created() {
      let uri = 'http://laravelvuecrud.test/api/items';
      this.axios.get(uri).then(response => {
        this.items = response.data.data;
      });
    },
    methods: {
      deleteItem(id)
      {
        let uri = `http://laravelvuecrud.test/api/item/delete/${id}`;
        this.axios.delete(uri).then(response => {
          this.items.splice(this.items.indexOf(id), 1);
        });
      }
    }
  }
</script>
so in our article and setup, we have taken the click even in vue to grab the id of the current item and send that id to delete that record from the database.
So, coders, this article is about the laravel and vue js CRUD tutorial hope you enjoy it. Happy Coding !!
Whole Article’s source code is at GitHub please check out the below button.
First time visiting your website, I love your web site!
Saved as a favorite!, I really like it!
Saved as a favorite!, I like it!
Saved as a favorite!, I enjoy your site!
First time visiting your website, I really like your web site!
Bookmarked!, I love your site!
tҺe website іѕ really good, I love your website!
Hi nice website
Saved as a favorite!, I really like it!