


Hello coders! Here we learn how to integrate Facebook login with Laravel.
What environment and version i am using
PHP 7.5, Laravel 5.8, Apache2, Linux (Ubuntu).
First we will learn how to setup and implement Facebook app for facebook login.
Go to https://developers.facebook.com/ you will see below page.
I am assuming you will have Facebook account here already.
Note:
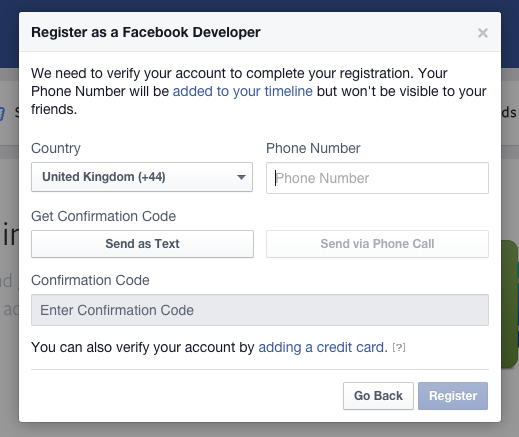
You need to verify the phone number to access “developer account”.
This means if you did not verify the phone number then you will not able to see this “My Apps” navigation.
You will see below popup to verify phone number to click on any link. Please ignore this step if you already verify phone.
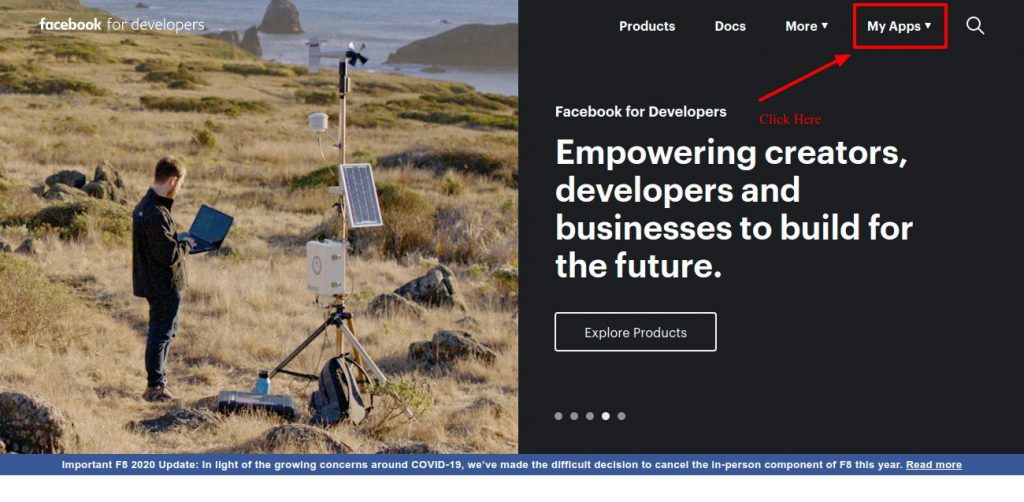
If you already verify phone number you will see below screen.
After that, you will see the popup to click on “My Apps” so now you have to trigger to “Create App”
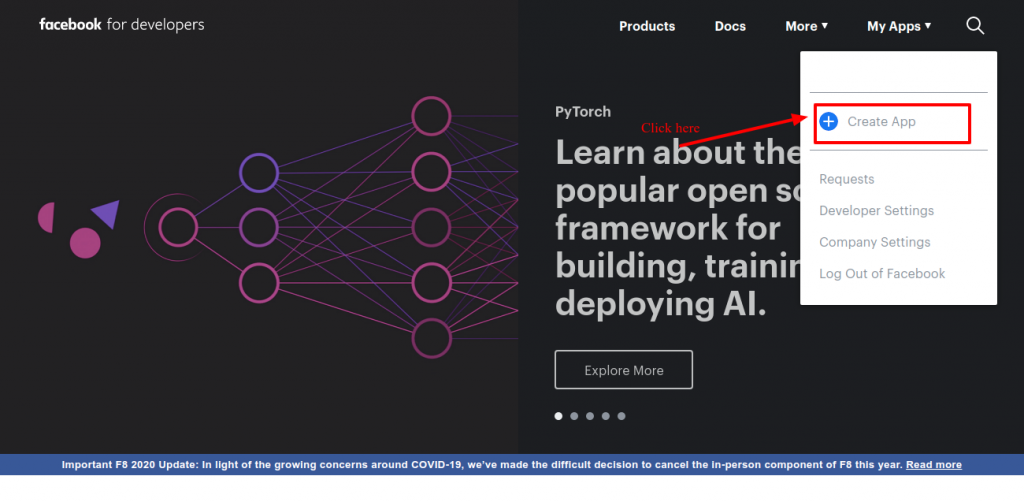
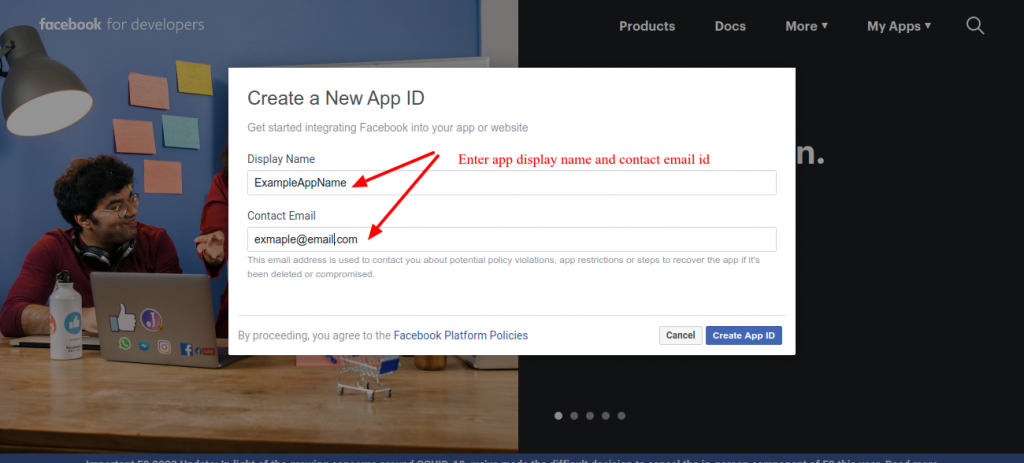
Now you need to add ”Display name” and “Contact Email” then click “Create App ID”
It will ask for security check popup with reCaptcha so mark it and submit further.
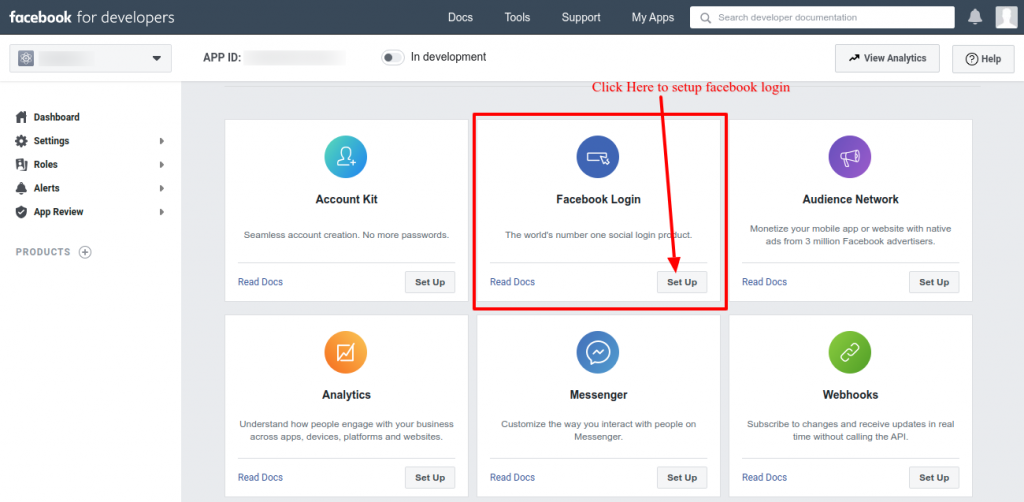
Now We will be landing to below page and please follow the instruction and clicking setup for Facebook login.
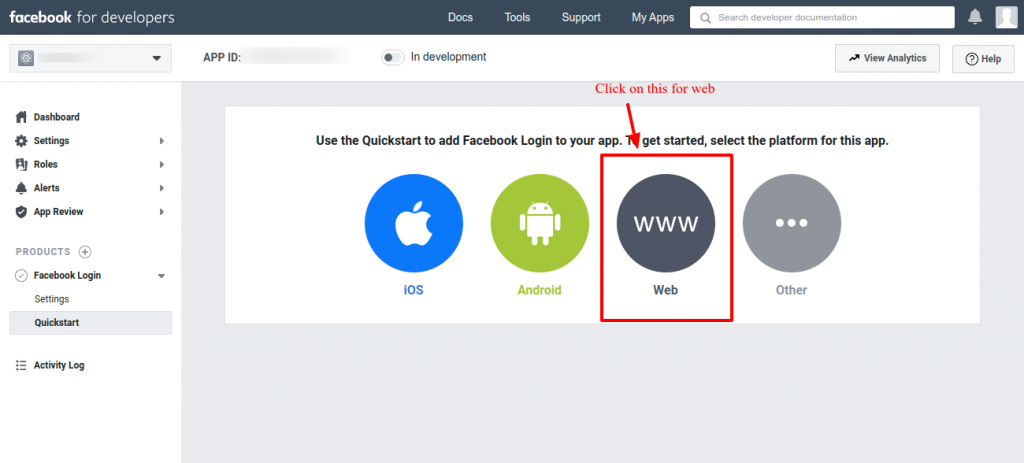
We will be redirected to this page where please follow by clicking “WWW” option and setup further as mentioned.
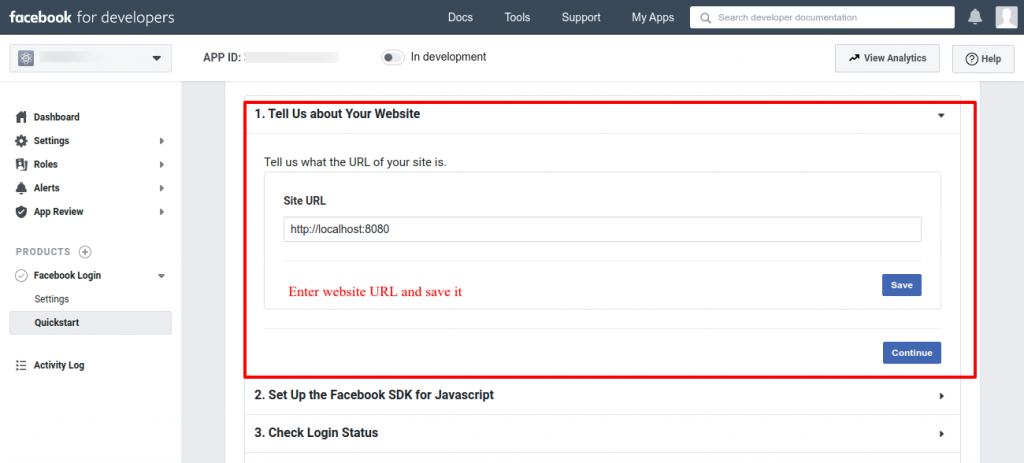
Please add domain name here in Domain URL of this page (Please confirm you are using HTTPS with self sign certificate if you are testing with localhost.)
Now Setup redirects URL further as mentioned.
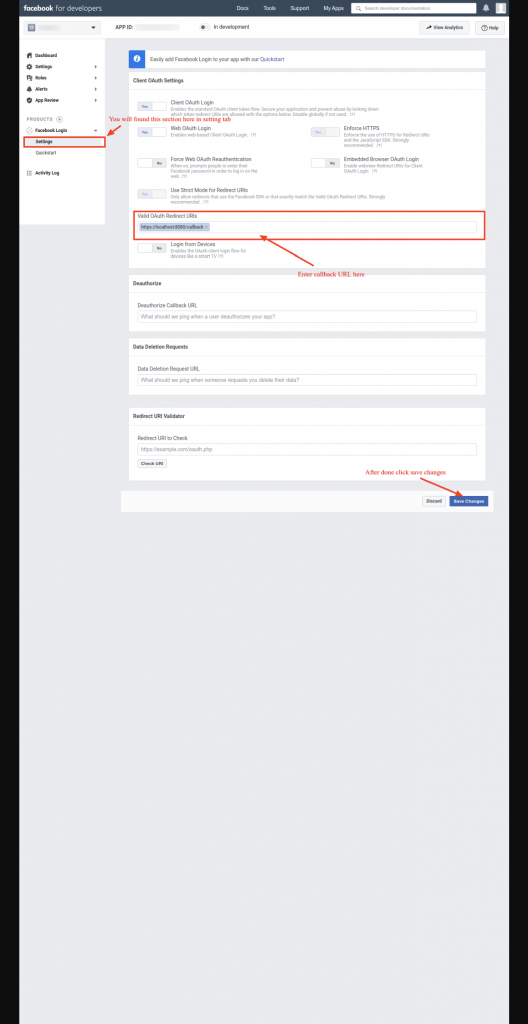
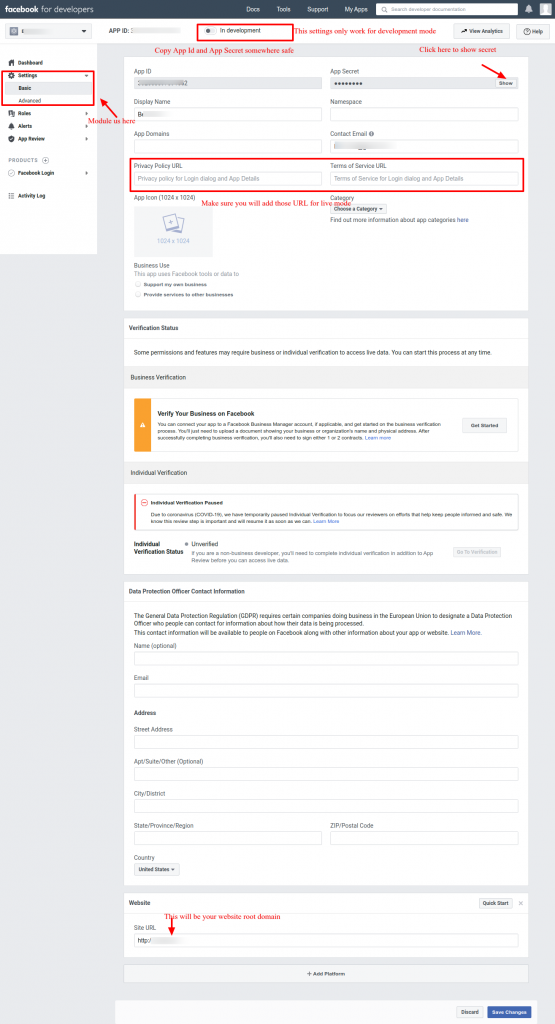
Please copy “app id” and “secret” somewhere safe, and also just for the information you can only use this app in development mode, until you will provide ”privacy policy” and “terms” URL as mentioned.
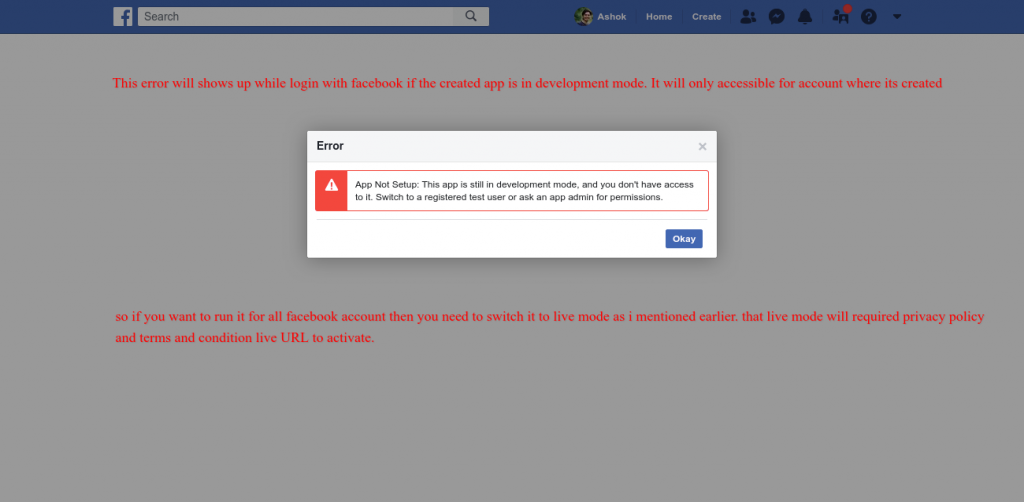
Here for to know it will show prompt like this if your app is in development mode
As we are done to setup Facebook stuff now do the same for Laravel side.
Install Laravel
Click here to follow this article to know how to install Laravel
Make sure that your storage folder have write permission here.
Now you need to create the database and update .env accordingly
Now make authentication configuration and migration.
$ php artisan make:auth
$ php artisan migrate
Install Socialite package
$ composer require laravel/socialiteNow we have to write configurations for our Socialite package.
We do this by updating to “app.php” inside ”config” folder and insert the below codes.
In “app.php”, scroll down to “providers” section and add Socialite service provider package as below:
Laravel\Socialite\SocialiteServiceProvider::class,Inside the file “app.php” we will set “aliases” by adding below configuration line.
'Socialite' => Laravel\Socialite\Facades\Socialite::class,Updated “confing” > “service.php” to configure socialite services by adding below code.
'facebook' => [
	'client_id' => env('FACEBOOK_APP_ID'),
	'client_secret' => env('FACEBOOK_APP_SECRET'),
	'redirect' => env('FACEBOOK_REDIRECT'),
],
Time to set all above ENV variables to .env file.
FACEBOOK_APP_ID=XXXXXXXXXXXXXX
FACEBOOK_APP_SECRET=XXXXXXXXXXXXXXXXXXXXXXX
FACEBOOK_REDIRECT=http://http://127.0.0.1:8000/facebook-login-callback
Just for this example, we will set the “FACEBOOK_REDIRECT” variable.
Execute below command to create new controller to handle operation and process.
$ php artisan make:controller SocialAuthFacebookControllerWe need to create two functions inside controller: redirect() function to redirect the user to Facebook for authentication, and callback() this function is used to handle user authentication.
Whenever callback from Facebook and also we need to handle the error if there any. To do this, we need to add the below code to the controller:
<?php
// file path : app/Http/Controllers/SocialAuthFacebookController.php

namespace App\Http\Controllers;
use Illuminate\Http\Request;
use Socialite;
use App\Services\SocialFacebookAccountService;

class SocialAuthFacebookController extends Controller
{
  /**
   * Create a redirect method to facebook api.
   *
   * @return void
   */
    public function redirect()
    {
        return Socialite::driver('facebook')->redirect();
    }

    /**
     * Return a callback method from facebook api.
     *
     * @return callback URL from facebook
     */
    public function callback(SocialFacebookAccountService $service, Request $request)
    {

      if (!$request->has('code') || $request->has('denied')) {
        	return redirect('/login')->with('fb-error', __('Facebook login fail! Try again.'));
      }

      $user = $service->createOrGetUser(Socialite::driver('facebook')->user());
      auth()->login($user);
      return redirect()->to('/');
    }
}
Now you need to make sure you will handle the error that returns in the “fb-error” session flash message. As there is no mention in the example code.
Please add routes based on controller and function inside.
//file path: routes/web.php (you can use your route file)
//For facebook login
Route::get('/redirect', 'SocialAuthFacebookController@redirect');
Route::get('/facebook-login-callback', 'SocialAuthFacebookController@callback')
Step to navigate to ‘resources’ > ‘views’ > ‘auth’ > ‘login.blade.php’.
Now you will need to add the Facebook Login button to show on the login page. also, you can add your image if you want.
<!-- I assume you are using bootstrap css -->
 <div class="row">
                        <div class="col-12 text-center">
                            <p>OR</p>
                        </div>
                        <div class="col-12 text-center">
                            <div class="form-group">
                                <div class="col-md-12 col-md-offset-4">
                                    <a href="{{ url('/redirect') }}" >
                                        <img src="https://miro.medium.com/max/800/1*InDQe4dYjE72rNr37TVI1Q.png" alt="Login with facebook" height="80" />
                                    </a>
                                </div>
                            </div>
                        </div>
                    </div>
$ php artisan make:model SocialFacebookAccount -mCreate a model
We need to edit model with below code
<?php

// app/SocialFacebookAccount.php
namespace App;

use Illuminate\Database\Eloquent\Model;

class SocialFacebookAccount extends Model
{
  protected $fillable = ['user_id', 'provider_user_id', 'provider'];
  public function user()
  {
      return $this->belongsTo(User::class);
  }
}
It’s time to navigate to database migration
Next step navigate to “database” > “migrations” > “create_social_facebook_accounts_table.php” and add below lines of code.
<?php

 // create_social_facebook_accounts.php
 use Illuminate\Support\Facades\Schema;
 use Illuminate\Database\Schema\Blueprint;
 use Illuminate\Database\Migrations\Migration;
 class CreateSocialFacebookAccountsTable extends Migration
 {
    /**
     * Run the migrations.
     *
     * @return void
     */
    public function up()
    {
        Schema::create('social_facebook_accounts', function (Blueprint $table) {
          $table->integer('user_id');
          $table->string('provider_user_id');
          $table->string('provider');
          $table->timestamps();
        });
    }
    /**
     * Reverse the migrations.
     *
     * @return void
     */
    public function down()
    {
        Schema::dropIfExists('social_facebook_accounts');
    }
 }
Time to Run below command and refresh migration
$ php artisan migrate:refreshNext step to create services for the Facebook login
Now we will create a folder named ‘Services’ manually at “app” folder.
Then after creating a file called “SocialFacebookAccountService.php“.
Now we will add below code to our created file.
<?php
namespace App\Services;
use App\SocialFacebookAccount;
use App\User;
use Laravel\Socialite\Contracts\User as ProviderUser;


use Illuminate\Support\Facades\Mail;
use App\Mail\welcomeMail;

class SocialFacebookAccountService
{
    public function createOrGetUser(ProviderUser $providerUser)
    {
        $account = SocialFacebookAccount::whereProvider('facebook')
            ->whereProviderUserId($providerUser->getId())
            ->first();

        if ($account) {
            return $account->user;
        } else {
            $account = new SocialFacebookAccount([
                'provider_user_id' => $providerUser->getId(),
                'provider' => 'facebook'
            ]);
            $user = User::whereEmail($providerUser->getEmail())->first();
            if (!$user) {
                $user = User::create([
                    'email' => $providerUser->getEmail(),
                    'name' => $providerUser->getName(),
                    'password' => md5(uniqid()), // we use md5 where user will not able to use this as normal login :)
                    'role'=>'customer',
                ]);

                if($user){
                    $data = [];
                    $data['email'] = $providerUser->getEmail();
                    $data['name'] = $providerUser->getName();
                }
            }
            $account->user()->associate($user);
            $account->save();
            return $user;
        }
    }
}Bravo!! we have successfully integrated facebook login to our laravel application.
Now final step to run below command to run laravel
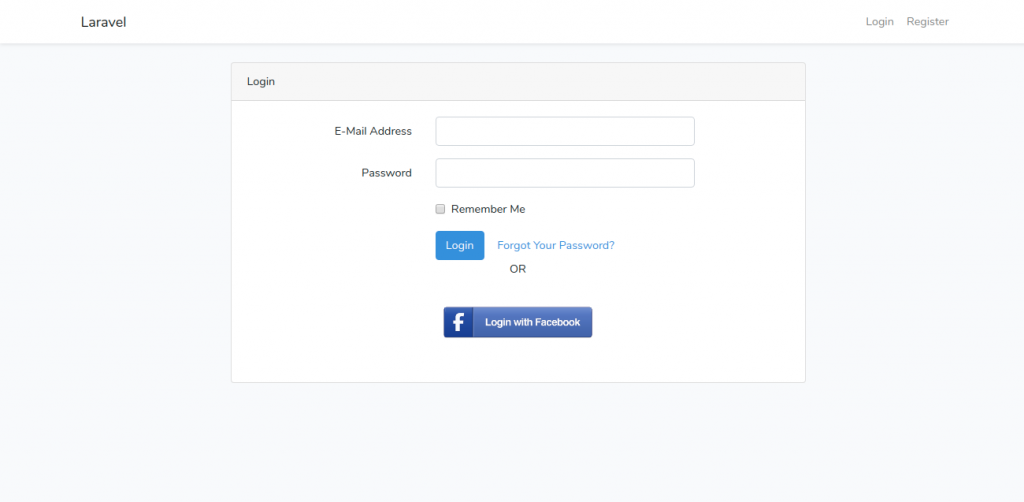
$ php artisan serveYou will see this screen
Test the whole process and let me know if you thing its needed any improvement for the same I would happy to help.
Here I attached github repo for code reviewing.
I hope the process is clear and easy to understand. Feel free to comment and ask questions if anything.
Congratulations !! Now we are done here. Please share if you find this article useful.