


Hello Coders !!
This tutorial is about the laravel stripe metered billing payment method. When you need to charge users monthly per usage in that case you can use this metered billing method.
So let’s use a fresh laravel source code for this so you can get the clean code and implement it on your site.
Step 1: Install fresh Laravel
Install fresh laravel using the below command.
composer create-project --prefer-dist laravel/laravel blogIf you need detailed steps for installing laravel please follow this link: Install Laravel
Step 2: Install Stripe Library
Using composer command install Stripe Library
Run below command in your site’s directory in the terminal window
composer require stripe/stripe-phpAfter successfully installed the library you are ready to use stripe metered billing and also other stripe’s method.
Step 3: Create a Stripe account and get API keys
The most important step for Laravel stripe metered billing payment method
Let’s create a Stripe account and get the API keys that need to integrate a payment gateway.
Create a stripe account and login to visit the stripe’s Dashboard. On the left menu bar, you will find the Developers Tab. Inside that tab, you will find the API keys menu from here you can get the secret key and publishable key.

From here take both the keys secret key and publishable key and set these keys in your .env file so in your whole project you can use it anywhere.
STRIPE_SECRET_KEY={Your key here}
STRIPE_PUBLISHABLE_KEY={Your key here}
Step 4: Setup Payment page
For ease of use, we are integrating payment form at the homepage of our new Laravel setup.
Add the form in homepage view
Open your {root}/resources/views/welcome.blade.php file and add below form.
After adding form the code the file will look like this.
<!DOCTYPE html>
<html lang="{{ str_replace('_', '-', app()->getLocale()) }}">
    <head>
        <meta charset="utf-8">
        <meta name="viewport" content="width=device-width, initial-scale=1">

        <title>Laravel</title>

        <!-- Fonts -->
        <link href="https://fonts.googleapis.com/css?family=Nunito:200,600" rel="stylesheet">

        <!-- Styles -->
        <style>
            html, body {
                background-color: #fff;
                color: #636b6f;
                font-family: 'Nunito', sans-serif;
                font-weight: 200;
                height: 100vh;
                margin: 0;
            }

            .full-height {
                height: 100vh;
            }

            .flex-center {
                align-items: center;
                display: flex;
                justify-content: center;
            }

            .position-ref {
                position: relative;
            }

            .top-right {
                position: absolute;
                right: 10px;
                top: 18px;
            }

            .content {
                text-align: center;
            }

            .title {
                font-size: 84px;
            }

            .links > a {
                color: #636b6f;
                padding: 0 25px;
                font-size: 13px;
                font-weight: 600;
                letter-spacing: .1rem;
                text-decoration: none;
                text-transform: uppercase;
            }

            .m-b-md {
                margin-bottom: 30px;
            }
        </style>
    </head>
    <body>
        <div class="flex-center position-ref full-height">
            @if (Route::has('login'))
                <div class="top-right links">
                    @auth
                        <a href="{{ url('/home') }}">Home</a>
                    @else
                        <a href="{{ route('login') }}">Login</a>

                        @if (Route::has('register'))
                            <a href="{{ route('register') }}">Register</a>
                        @endif
                    @endauth
                </div>
            @endif

            <div class="content">
              @if(!empty($successMessage))
                <div id="success-message">{{$successMessage }}</div>
              @endif
<div id="error-message"></div>
 <form method="POST"  action="{{ url('payment') }}" aria-label="{{ __('PaymentSubmit') }}" id="pay-submit" >
        @csrf
    <input type="hidden" name="user_id" value="1">
    <!-- If you need any value you can add it like this -->

    <input type="hidden" name="stripeToken" id="stripeToken" value="" />
</form>


            </div>
        </div>
    </body>
    <script type="text/javascript" src="https://js.stripe.com/v2/"></script>
<script src="https://code.jquery.com/jquery-3.4.1.min.js" type="text/javascript"></script>
<script src="https://checkout.stripe.com/checkout.js"></script>
<script>

        // Handling and displaying error during form submit.
        function subscribeErrorHandler(jqXHR, textStatus, errorThrown) {
            try {
                var resp = JSON.parse(jqXHR.responseText);
                if ('error_param' in resp) {
                    var errorMap = {};
                    var errParam = resp.error_param;
                    var errMsg = resp.error_msg;
                    errorMap[errParam] = errMsg;
                } else {
                    var errMsg = resp.error_msg;
                }
            } catch (err) {

            }
        }

        // Forward to thank you page after receiving success response.
        function subscribeResponseHandler(responseJSON) {

            if (responseJSON.state == 'success') {

            }
            if (responseJSON.state == 'error') {

            }
        }
        var handler = StripeCheckout.configure({
        //Replace it with your stripe publishable key
            key: "{{ env('STRIPE_PUBLISHABLE_KEY') }}",
            // image: '{{asset('logo.png')}}', // add your company logo here
            allowRememberMe: false,
            token: handleStripeToken
        });


        submitpayment();
        function submitpayment() {
            handler.open({
                name: 'Laravel-Stripe',
                description: 'Metered Blling',
                amount: '15000'
            });
            return false;
        }
        function handleStripeToken(token, args) {
            form = $("#pay-submit");
            $("input[name='stripeToken']").val(token.id);
            var options = {
                error: subscribeErrorHandler,
                // post-submit callback when success returns
                success: subscribeResponseHandler,
                // complete: hideProcessing,
                contentType: 'application/x-www-form-urlencoded; charset=UTF-8',
                dataType: 'json'
            };
            // form.ajaxSubmit(options);
            form.submit();
            // return false;
        }

</script>
</html>
Step: 5 Controller file HomeController.php
Inside app/Http/Controllers/HomeController.php file, there is one function payment() we are going to add store and payment code there.
We have defined this route on web.php routes file like this.
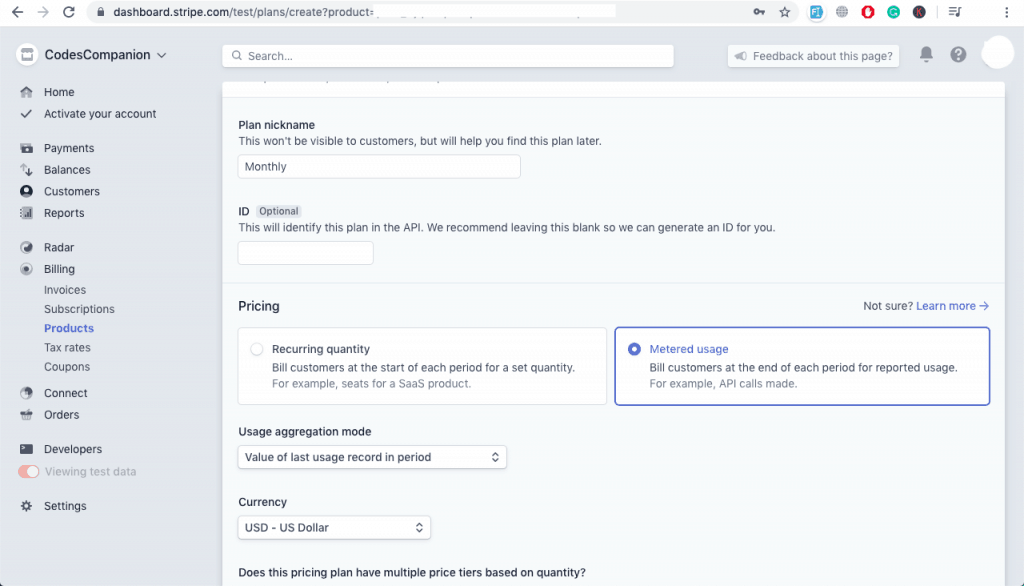
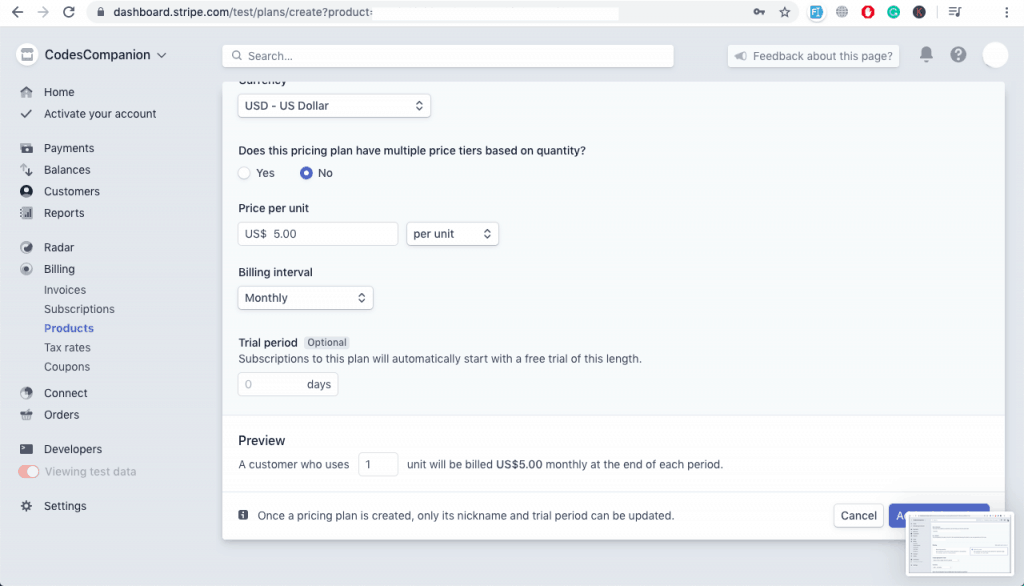
Route::post('payment','HomeController@payment');So Now, in HomeController.php file we are going to create a plan for this metered billing subscription. You can create a plan directly in Stripe.com using Dashboard’s create plan menu and you can also create a plan using Stripe’s call function.
Here we are creating a plan using Stripe’s Dashboard.
After login click on Billing > Products from the left menu bar.
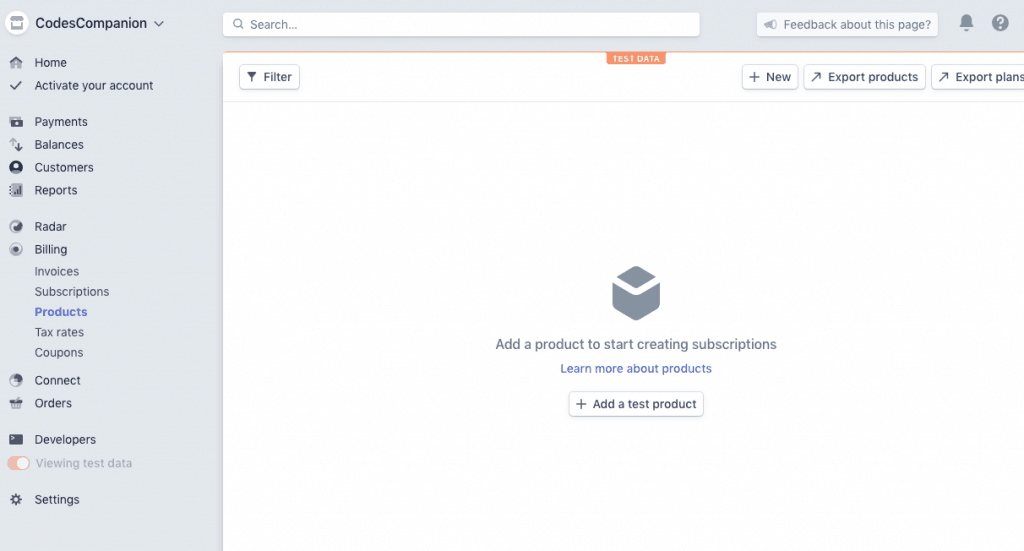
From this page click on +Add a test product
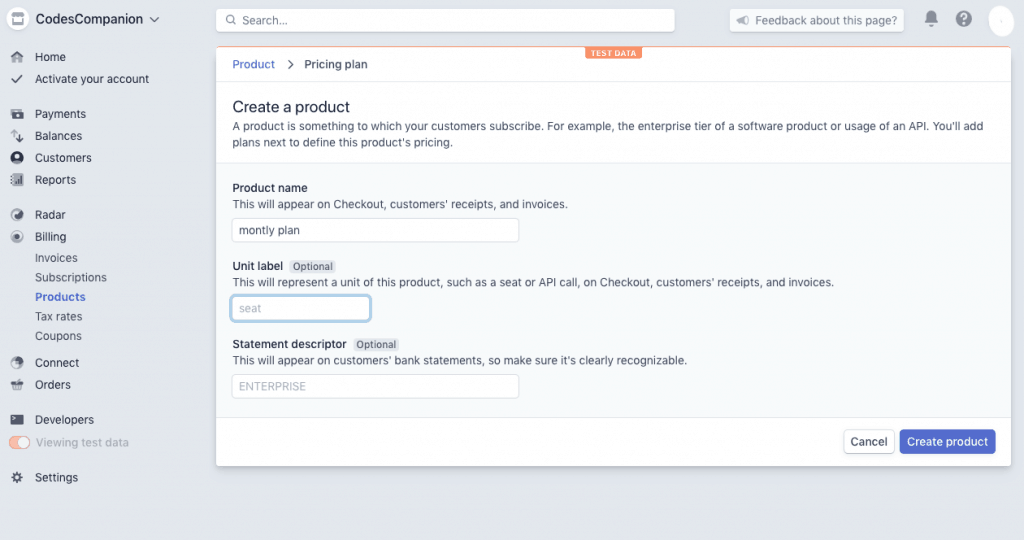
After Add a product you can see the product ID that will be useful in our next step.
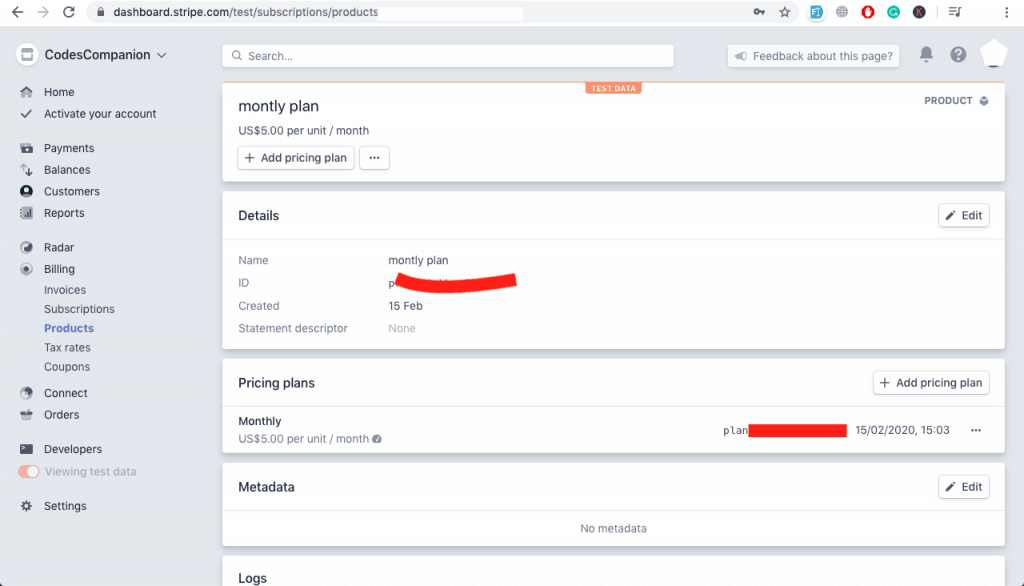
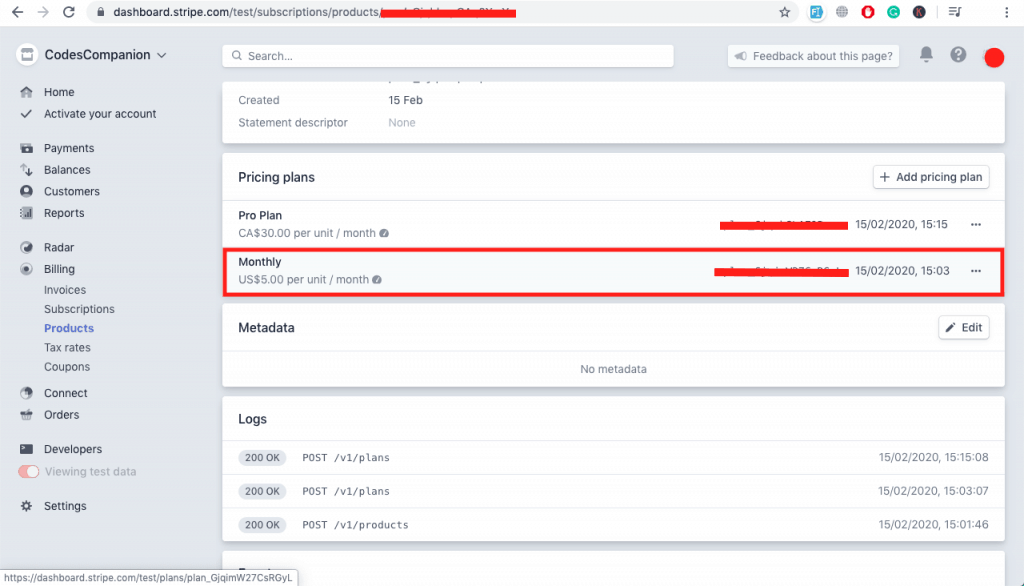
After adding a product now we can create a plan using Stripe’s metered billing functions.
 \Stripe\Stripe::setApiKey(env('STRIPE_SECRET_KEY'));

		$plan = \Stripe\Plan::create([
		    'currency' => 'cad',
		    'interval' => 'month',
		    'product' => 'prod_GjqhbxxCAq2XmY',
		    'nickname' => 'Pro Plan',
		    'amount' => 3000,
		    'usage_type' => 'metered',
		]);
This snippet will create a plan in Stripe’s dashboard and will generate a plan like this.
Create customer in Stripe
// Create a customer
		$customer = \Stripe\Customer::create([
			'name' => 'Customer1',
		    'email' => 'cust.omer@example.com'
		]);
		//Store this data in database, $customer->id
This snippet will create a customer in Stripe
Create a subscription for this customer
//Create subscription
		\Stripe\Subscription::create([
		  'customer' => 'cus_GjrAgbuWzdsg0G', // here you can use recently created customer ID => $customer->id
		  'items' => [['plan' => 'plan_GjqimW27CsRGyL']], //Here you need to write the plan for this customer or you can directly put the recently create plan from above from $plan object.
		]);
This will create a customer’s subscription.
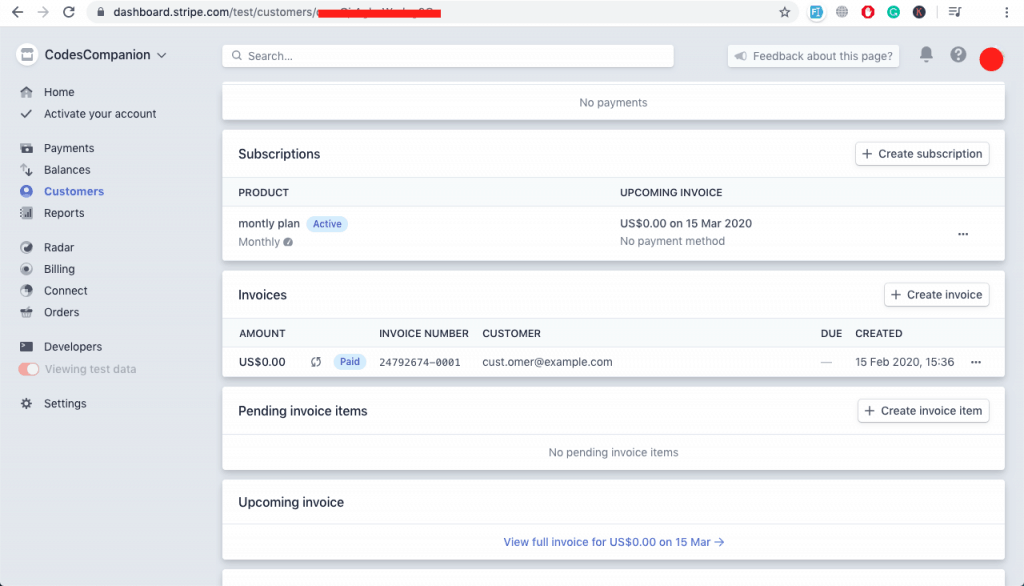
So now you are ready with that subscribed customer. Store all the information about the product, plan, customer, and subscription in the database.
You are almost complete the Laravel stripe metered billing payment method. Check the final HomeController file. It will look like this.
<?php

namespace App\Http\Controllers;

use Illuminate\Http\Request;
use Illuminate\Support\Facades\Redirect;

class HomeController extends Controller
{
    /**
     * Redirect the user to the Payment Gateway.
     *
     * @return Response
     */
    public function payment(Request $request)
    {
       //Create plan for sunscription

    	// Set your secret key: remember to switch to your live secret key in production
		// See your keys here: https://dashboard.stripe.com/account/apikeys
		\Stripe\Stripe::setApiKey(env('STRIPE_SECRET_KEY'));

		$plan = \Stripe\Plan::create([
		    'currency' => 'cad',
		    'interval' => 'month',
		    'product' => 'prod_GjqhbcpCAq2XmY',
		    'nickname' => 'Pro Plan',
		    'amount' => 3000,
		    'usage_type' => 'metered',
		]);
		//Store this data in database

		// Create a customer
		$customer = \Stripe\Customer::create([
			'name' => 'Customer1', // Use name that comes from email
		    'email' => 'cust.omer@example.com' //Use email that comes from form
		]);
		//Store this data in database, $customer->id

		//Create subscription
		\Stripe\Subscription::create([
		  'customer' => 'cus_GjrAgbuWzdsg0G', // here you can use recently created customer ID => $customer->id
		  'items' => [['plan' => 'plan_GjqimW27CsRGyL']], //Here you need to write the plan for this customer or you can directly put the recently create plan from above from $plan object.
		]);


		//dd($customer);// You can store information from $customer
		return Redirect::back();
    }

}
Do not put all the code there just keep the needed once because this file contains code for creating a plan, Customer and Subscription.
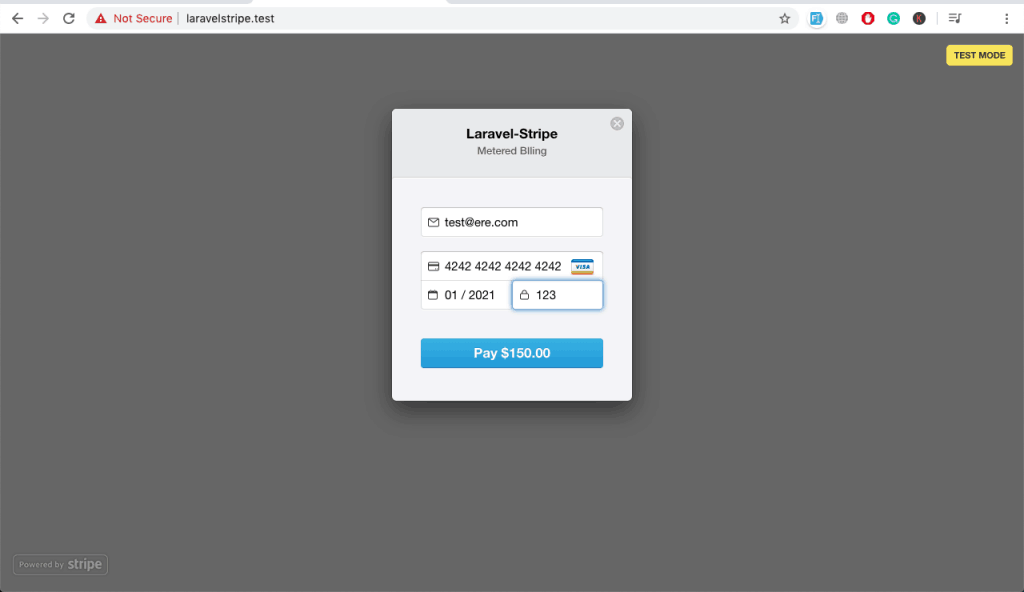
Below is the Stripe’s payment popup screenshot.
Now, you are ready to go with the payment so this is the complete tutorial about the Laravel stripe metered billing payment method. Enjoy !!
Great content! Super high-quality! Keep it up! 🙂